Proper installation of wall tiles plays a crucial role in enhancing the overall appeal and functionality of the space. Well-installed tiles provide countless benefits beyond only aesthetics. They protect the wall against critical damage from moisture, cracks, and scratches. Therefore proper installation of tiles is especially required for increasing the durability of your decor. But with so many options sometimes it becomes difficult to crack the perfect method for installing wall tiles.
In this blog, we have brought you a step-by-step guide on how to install wall tiles perfectly for creating amazing decor.
Here, you will get a clear-cut idea and procedure for the whole installation technique. Let's dive in.
Preparing the Surface
The very first step for the installation is to prepare a smooth surface. It ensures an even foundation for installing tiles and will help you in forming a pleasant pattern. To prepare a perfect smooth surface start by thoroughly cleaning the area to remove dust, dirt, and debris. Scrub the rough surface with sponge using a mild detergent to achieve a clean surface. After the cleaning, rinse the wall surface a couple of times and allow it to dry completely before the next step.
Cleaning is followed by inspection in the very next step. Check for any potential cracks, holes, or imperfections on the wall surface. If you find any gap, then fill it using a putty knife or a filling tool and level the surface with the surroundings. Be very careful during filling those gaps, otherwise it can lead to uneven surfaces that will lead to damaged installation. If you find any high or low spots, mark them and make a plaster or joint to even out. Always apply the plaster using a trowel to gain a flat and even surface. Finally, use a sanding block or sandpaper to smooth out the rough patches or uneven areas.
Measuring and Planning

After preparing a smooth foundation for the tiles, it's now time to measure the perfect shape of tiles and create a blueprint for a professional look. Start measuring from the wall where the tiles are going to be installed. Measure its height and width accurately to have a keen idea for the required shape and size of wall tiles. Take into account the negative spaces like windows and fixtures which have to be left free. It will give you precise measurements and help you choose the perfect number and dimension of tiles.
According to your available space, pick a layout to install the wall tiles. Choosing a perfect layout is very important as it will be responsible for the stunning visual appearance of tiles. Decide whether you want a full version of tiles on both edges or cutting is required. To create a balanced and symmetrical layout you may have to cut the tiles on both sides.
Cutting Tiles
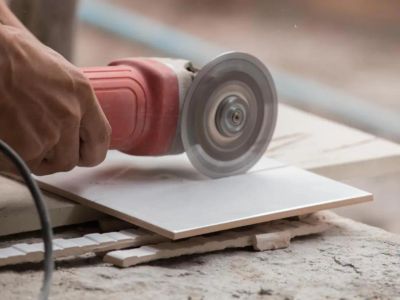
Cutting wall tiles is an essential process to make them fit around obstacles such as windows, electrical outlets, and doors for a seamless appearance. For a perfect fit, start measuring the dimensions of both the obstacles and the wall tiles. Use a tile cutter for creating straight and smooth cuts. Place the wall tile on the cutter and align it using the manufacturer's guide. Apply even pressure on the tile surface along the cutting line using the cutting wheel. Once scored use the tile cutter's lever to apply force and snap the tiles along the marked line.
For artistic designs, you may need versatile cuts such as curves or irregular shapes. For these types of cuts nippers and pliers can be used. Nippers and pliers are used to remove marked areas from the tiles to give them the desired shape and size. But remember to be very careful during making these cuts as it can damage or break the wall tiles.
Applying the Adhesive

Applying adhesive to the wall surface and positioning the tiles carefully are crucial steps in ensuring proper adhesion and a successful tile installation. Here's a guide on how to apply adhesive and position the tiles effectively:
Preparing the Adhesive: Follow the manufacturer's instructions to prepare the tile adhesive. Mix the adhesive thoroughly until you achieve a smooth and consistent consistency. Allow the adhesive to sit for a few minutes before using it.
Starting in the Centre: Begin the tile installation by starting in the center of the wall. Use a measuring tape to find the midpoint of the wall horizontally and vertically. Mark this point as your starting point for the first tile.
Applying the Adhesive: Using a notched trowel, apply a layer of adhesive to a small section of the wall, starting from the center point. Hold the trowel at a 45-degree angle and spread the adhesive evenly, creating ridges or grooves. Work in small sections to ensure the adhesive remains workable.
Grouting
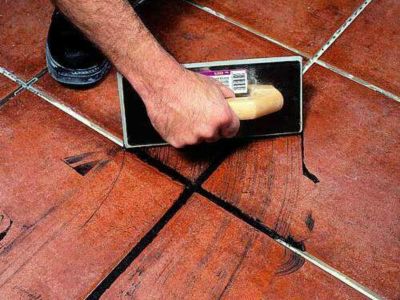
Now we are on the last and the most important part of this journey. The perfect grouting of tiles is crucial for filling those ugly gaps and strengthening the bonds to create a mesmerizing appeal. First of all we need to prepare the grout mixture. The simplest method for it is to add the grout powder into a bucket and prepare a mixture by slowly adding water to it. Mix it well to achieve the consistency and avoid lumps formation. Adding too much water can weaken the mixture therefore a perfect ratio is required. You can check it out on the manufacturer's instructions manual.
Once the grout is mixed, allow it to sit for a few minutes before applying. Using a grout float or a rubber grout applicator, scoop a generous amount of grout onto the float and apply it diagonally across the tiles. Hold the float at a 45-degree angle and press the grout into the gaps, working in small sections. After applying the grout, hold the float at a steeper angle (approximately 60 degrees) and use it to smooth and remove excess grout from the tile surfaces. Glide the float diagonally across the tiles, being careful not to dig into the grout lines. This process helps ensure a uniform and flush appearance.
Conclusion
Following all these steps one by one you will master the art of installation for wall tiles. After all these measures steps you can go for the finishing touch and give your wall the desired luster and beauty that it deserves. However, it might not be a simple job for everyone. If you are still confused, then you must connect to a professional for proper installation.
About NACS
NACS International is one of the industry titans in manufacturing and exporting high class ceramic products globally. We serve our customers with quality and durable wall tiles that not only channelize beauty but also promise seamless functionality. With lightweight and high endurance our tiles are easy to cut and install in any space. We also provide an array of designs and collections inspired by world's famous designers. Pick out your one today and become a part of our happy and trusted family. To choose the best wall tile design or to resolve any queries reach us anytime. We will be happy to serve you with our best.